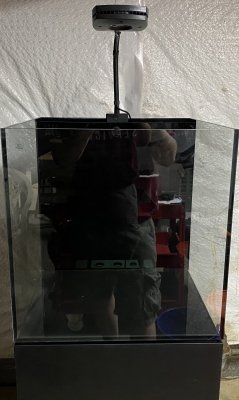
Waterbox 35.1 Cube

Jdubyo

Active Member
View Badges
Joined
Aug 23, 2018
Messages
196
Reaction score
248
Rating - 0%
0   0   0
Hello fellow reefers!

I recently purchased a Waterbox aquarium and decided to make up a build thread. This will be my second tank but I want this to be my first "do it right" tank since my first one was filled with error and is quickly turning into an aiptasia haven... ;Sorry I am making this thread to keep myself accountable and am hoping you all will keep me in check as well!

Most recent tank shot:

November 13th, 2020

A6BCC703-66A3-487C-999D-E7967E83F57E.jpeg

Current Gear:
  • Waterbox Marine 35.1 (Not Marine X)
  • AI Prime 16HD Reef
  • Ecotech Vectra M1 return pump
  • 100w Eheim Jager TruTemp heater (X2 for redundancy)
  • Bulk Reef Supply 150 GPD 4 stage RO/DI
  • Nero 3 Powerhead x2
  • Tunze Osmolator 3155
In the Tank!
  • Tropic Marin Pro Reef salt
  • Marco Reef Saver dry rock
  • CaribSea Special Grade Reef Sand
My Build Related Threads

IMG_0415.jpeg
 
Last edited:
OP
OP
Jdubyo

Jdubyo

Active Member
View Badges
Joined
Aug 23, 2018
Messages
196
Reaction score
248
Rating - 0%
0   0   0
While I want to keep this thread about MY build. I'd like to do a quick review on my experience with Waterbox so far.

Waterbox Initial Review:

Ordering and Payment:

I initially had ordered the Waterbox 20 cube AIO tank and shortly after ordering decided I would prefer the Marine 35.1. I sent Waterbox an email requesting information on updating my order to this tank. They quickly responded and were able to upgrade my order after trading just three emails. The staff came off as friendly, helpful and professional so they get a thumbs up from me off the bat. They also offer payment plans which I did opt for (times are tough for a reefer) with zero percent interest for twelve months. I thought this was great and I am sure it helps them out as a company with sales. One unfortunate side to shipping an aquarium are the cost to ship. I have never had anything delivered via freight but the charge for shipping was one hundred and fifty dollars. I initially thought this was a little steep but hoped it would result in a safely shipped aquarium. :)

Shipping and Delivery:

I did have a bit of a wait time for the shipping to be completed. When I ordered the tank the website said to expect 6 weeks for delivery. I am in no rush so I didn't mind but the tank did end up arriving in 3 weeks so that was a nice surprise. The shipment arrived via UPS in a lift gate truck. I went outside to meet the driver when I saw him pull up to my house. I will not lie, when I saw the shipment for the first time I was slightly worried. The box itself had been completely shrink wrapped with the stand and light on top of it. It appeared to be completely intact however, two of the four legs that hold the box off the ground were busted off and it was leaning considerably to one side. This was either the result or the cause of one of the braces on the pallet it came on being busted as well. It was at least placed on a second pallet for more support. While I do no blame Waterbox for this in anyway, there is a reason behind me sharing this and I will get to that in a moment. When I scheduled the appointment for the shipment to be dropped off the UPS worker told me that the drivers would not be able to bring the shipment up to my house and it would have to be left at the end of the driveway. I figured I would ask the driver if he would be willing to bring it up to my garage and he did so that was nice. I didn't want to have to lug two hundred and twenty five pounds of aquarium up my driveway. So he brought it up and I got everything in my garage to do an initial inspection. I checked the light and stand first. These were both in separate cardboard boxes and they made it fine through shipping. Next, I worked on the Waterbox itself. This was in a box that was stapled closed on the sides with the top screwed in to it. The material of the box appeared to be a super dense cardboard. I originally thought it was a wooden box before I had it taken apart if that gives you any idea of the density. After unscrewing the top off, I noticed really how well this thing was packed for shipping. There was very little room for anything to move around and there was foam and cardboard everywhere to absorb any shocks during the shipment. The plumbing was inside with the tank and the sump was inside the tank with foam in between glass panes to keep them from touching. I was thoroughly impressed with the quality of shipping materials and think it was worth the shipment fee. The tank, sump and all equipment arrived looking immaculate.

Stand Assembly:

Upon initial inspection of the stand, the material looks high quality and all of the hardware looks nicer than average. I will say there were 3 cam screws that came stripped. That was a little confusing. It looked like someone took a drill and ran the bit around the top of it and I could not use them at all. Luckily it did come with spares so I had enough to be covered. It also came with plastic covers for the cam locks that match the cabinet. These have a small "+" in the center of them so they would push right into the cam lock and stay there. I thought this was a nice touch however, they appear to have drilled the holes for the cam locks too far and they sit far enough back where the covers will not reach them to stay in place. This is a minor annoyance and I am sure I can come up with something to cover them with. Each piece of the stand itself has a sticker with a letter on it to make the instructions easier to understand. I originally tried to peel one of these directly off the stand and noticed it left almost all of the glue on the stand. The sticker was totally smooth on the side where it had previously stuck to the stand. So, the first thing that came to mind to remove this was acetone. This was a bad idea. If you take anything from this post let it be DO NOT USE ACETONE ON THE STAND TO REMOVE STICKER RESIDUE. When I did it, it started to remove whatever coating was on the stand and the towel I used with the acetone turned black. There was a smudge on the stand where I used it and you could tell it was removing the coating. Luckily this is going to be where the sump will be sitting so it will be out of sight. I used a hairdryer on all the other stickers prior to peeling them off and this left little to no residue on the stand. Without the few hiccups I ran into with the stand, it probably took me a little over an hour to assemble. It certainly could take less since I easily get distracted. The assembly procedure was straight forward and simple.

Tank and Sump:

The tank and sump look very nice and professionally built at first glance. It isn't filled yet but all of the silicone seams were definitely done by someone who knows what they are doing. The tank itself is a 17.7 inch cube holding 22 gallons and the sump is 15 by 12.6 by 15 inches holding 11.2 gallons. There is a 2.1 gallon RO reservoir built into the sump. This seems a tad small to me but if that ends up being the case, I will just use an external one. The back of the tank has an overflow that takes up the entire back pane. The overflow feeds directly into two itty bitty 2.75 inch filter socks. I will probably use these during the cycling process but will change to some other means of mechanical filtration later on. After the filter socks there are two large baffles on either side of the tank that feed into the center where the drain, emergency drain and return are located. I think this area is large enough for me to place my heaters and I may or may not place them here depending on how distracting I think the power cords coming out of the top are. The sump fits almost perfectly in the stand so there will not be any room for keeping anything else inside of the stand. There may be some room to add a shelf or mount some other equipment to the side panels further down the road.

Plumbing:

The plumbing was packaged well with the threaded pieces taped up to avoid any damage during shipping. All the pieces feel glued well and were very easy to install. It took 10 minutes to assemble at most.


Overall:

I think this tank looks sharp. The all black stand looks seamless from the front. The black glass backing within the tank is also nice and will be easy to clean if necessary. I have to say I was a little weary of the price point for this tank but I am over all very happy with my first experience with Waterbox Aquariums. Though I haven't filled the tank at this point, from what I have seen thus far, I would recommend them to new or experienced reefers. Assuming all goes well with this tank, I would definitely consider being a return customer when it comes time to upgrade.

TL;DR:

Ordering - Easy and painless.
Payment - Thumbs up for 0% interest payment plans.
Customer Service - Friendly, helpful and professional.
Shipping - Three weeks due to backorder. A+ on packaging for shipping.
Delivery - Comes on a lift gate. UPS is rough on packages (I would know. I worked there for four years)
Stand - 1 hour assembly time. DO NOT USE ACETONE TO REMOVE STICKER RESIDUE.
Tank and Sump - Look amazing.
Plumbing - None yet.
 
Last edited:
OP
OP
Jdubyo

Jdubyo

Active Member
View Badges
Joined
Aug 23, 2018
Messages
196
Reaction score
248
Rating - 0%
0   0   0
I started to work on an aquascape this morning. I had pre-made one in anticipation of getting the tank however I didn’t take into consideration that the 17.7 inches of depth included the overflow. My first aquascape was too close to the glass for my liking so I tore that one down and restarted. Luckily I was able to salvage most pieces from the original build into the new one. Here is what I have so far:

0E4B3EC5-57CE-4304-B0FD-37890731E7AB.jpeg


The rock is Marco dry rock. The back right pillar section is being held together by an acrylic rod. I wanted to keep this section held by the rod only for the event that I may need to break it down at some point (knock on wood). That way I could possibly avoid tearing the whole aquascape apart if just a section needed to be removed. All the other pieces are currently being together with superglue but will eventually be cemented with the Marco mortar and covered in some Fiji pink sand to make it look more natural. I saw this trick in a bulk reef supply video recently :D. I may make some changes to this still. It’s only about 7 or 8 inches tall currently so I may create a cave or ledge for the top right section. Let me know what you think. This is my first time trying to do something other than just stacking rocks.
 
OP
OP
Jdubyo

Jdubyo

Active Member
View Badges
Joined
Aug 23, 2018
Messages
196
Reaction score
248
Rating - 0%
0   0   0
A few slight set backs happened tonight... :confused: I did get my plumbing in and that went smoothly. While I was doing this I thought the return chamber in the sump looked awfully small. I took out my pump and found out the footprint on my pump is too big to fit. I could remove the base of it and shimmy it in there making it stand partially on end but this is my “do it right” tank. So I will be looking for a new pump.

Secondly, I went to try the AI prime 16HD reef light for the first time and it does not work... brand new, out of the box and... nothing. Everything I see online and in the manual says it just turns on within thirty seconds of when you plug it in. Here is what I have well over 30 seconds:

EA7876EE-E2A3-4500-A187-5E3F16E6A577.jpeg


As you can see, the adaptor has the standard green light that shows it has power running to it. I unplugged and plugged everything back in, tried different outlets, and checked the app but the light is just not working. For anyone reading this who is unfamiliar with the light, the AI logo on top of the light should illuminate shortly after being plugged in for the first time.

I also noticed this:

C4014B28-368B-4406-B5F3-7E72ACF2DCAA.jpeg


It seems the exterior casing was either not put together properly or had been bent/damaged in some way. I would try to take it apart to inspect it but I am going to call Waterbox and/or AI ASAP first to see if I am able to get a new one. I don’t want to void any warrantees.

After all this I tried to work on my aquascape some more but just ended up creating more rubble and pieces of rock that I didn’t like. All in all, it was an unproductive evening.o_O
 
Last edited:
OP
OP
Jdubyo

Jdubyo

Active Member
View Badges
Joined
Aug 23, 2018
Messages
196
Reaction score
248
Rating - 0%
0   0   0
Current mood: irritated.

I was just looking up the business hours and phone number for Waterbox and stumbled upon their clearance section. It now includes this exact tank for over $300 less than I paid. Just 3 days after receiving it...


1600427044486.jpeg
 
OP
OP
Jdubyo

Jdubyo

Active Member
View Badges
Joined
Aug 23, 2018
Messages
196
Reaction score
248
Rating - 0%
0   0   0
I decided to take a look at my current aquascape in the tank. I put towels over the glass and my cardboard template on the bottom to avoid any accidents. Here is what I have:

E353E06A-644F-4F3A-8E9B-3F5BBD695F18.jpeg


Top down for depth:
24E26A8E-1D2C-45E6-8094-DEDBB727DCBB.jpeg


I think I might keep it like this. I don’t want to add too much and then not have room for coral growth. I’d rather it look great in 2 years than right now. I’ll just cut the acrylic rod and drill halfway through a small rock to create a cap for it.
 
OP
OP
Jdubyo

Jdubyo

Active Member
View Badges
Joined
Aug 23, 2018
Messages
196
Reaction score
248
Rating - 0%
0   0   0
Light update:

I contacted AI and they are sending me a new light. Only took about 5 minutes too. Great customer service from them. :)
 

Uni68

New Member
View Badges
Joined
Sep 19, 2020
Messages
2
Reaction score
0
Location
liverpool
Rating - 0%
0   0   0
Great information. I'm deciding between this and the marine X. Any chance you can share some photos of the sump? Also how much of the depth is taken up by the weir?
 
OP
OP
Jdubyo

Jdubyo

Active Member
View Badges
Joined
Aug 23, 2018
Messages
196
Reaction score
248
Rating - 0%
0   0   0
Great information. I'm deciding between this and the marine X. Any chance you can share some photos of the sump? Also how much of the depth is taken up by the weir?
Sure thing! Here’s the sump:

BB90EDA9-BEF1-4CAF-B923-32CBCFEBA4B4.jpeg


I took this picture before the plumbing was in so I’ll explain. The back left is where the drain comes down to and then goes over the baffle to the front left chamber which is the skimmer chamber. Then it goes under the center baffle and over the second baffle to the back right chamber which is for the return pump. The front right chamber is the 2.1 gallon top off storage.

As for the weir itself, it is only about 3/16ths of an inch. If you meant the actually overflow area, that is about 3 and 3/8ths inch. So I guess this technically isn’t a cube build... maybe a #mod can make the call if it should be moved to the nano build forum?
 
OP
OP
Jdubyo

Jdubyo

Active Member
View Badges
Joined
Aug 23, 2018
Messages
196
Reaction score
248
Rating - 0%
0   0   0
Here is an update on the aquascape:

C6D0281C-7BDE-4126-8BEC-A689EE907864.jpeg


After I did my first coat of the Marco mortar, I felt that I did not use enough so I went over it a second time. In hindsight I probably should not have done a second coat because I had to do a third coat to attach the sand o_O I am not unhappy with the way it turned out but it looks a little lumpy and I think it could have been better. Live and learn. I still need to add something to the top right corner...;Brb
 
Last edited:
OP
OP
Jdubyo

Jdubyo

Active Member
View Badges
Joined
Aug 23, 2018
Messages
196
Reaction score
248
Rating - 0%
0   0   0
What are your plans on mounting equipment will you be drilling the stand?

This is up in the air at the moment. I want to avoid drilling the cabinet at all. I have an audio equipment rack cabinet that I am considering modifying into a controller mount. it’s not the prettiest thing in the world so it’ll take some work. I am still unsure though.
 
OP
OP
Jdubyo

Jdubyo

Active Member
View Badges
Joined
Aug 23, 2018
Messages
196
Reaction score
248
Rating - 0%
0   0   0
So this happened:

370ED2B4-3CAF-425C-8200-CFF15003B589.jpeg


I lost an undersized 2 gallon ATO but I gained probably a gallon of system water volume and now I don’t need to buy a new pump. Saving money makes me happy ;Shamefullyembarrased

To remove the baffle that separated the ATO from the original return chamber, I used a .010 guitar string (the smallest diameter string) that I already had and slowly pushed it down in between the glass panes to separate them from each other. I could not get it to maneuver around the corners so I used a razor blade on the bottom. Once this was done I moved the baffle side from side to expose more of the silicone and used the razor blade to remove the remaining bits that were holding it together. Once the baffle was removed I cleaned it up with some acetone.

I have done this procedure before with home made sumps but never on a professionally made one so it was a little nerve racking but I just took my time and all went well. This definitely voided the warranty on the sump but you gotta do what you gotta do!
 
OP
OP
Jdubyo

Jdubyo

Active Member
View Badges
Joined
Aug 23, 2018
Messages
196
Reaction score
248
Rating - 0%
0   0   0
Is it wet yet?

Unfortunately not yet. I have had some “life” happen the past few weeks with one of my dogs in and out of the hospital (He’s going to be ok) so that’s why I haven’t updated recently. I am waiting for some more supplies to ship in and I am also going to cure the rock for a couple weeks to check for phosphate leeching. I can’t seem to find a reliable source that says if Marco and Pukani rock will leech. It seems to be a 50/50 split on whether it does or not.
 
OP
OP
Jdubyo

Jdubyo

Active Member
View Badges
Joined
Aug 23, 2018
Messages
196
Reaction score
248
Rating - 0%
0   0   0
Here is an update on the aquascape:
2B033AC4-0BB6-4A24-9443-182C20D7FE0E.jpeg
F7117440-195B-486D-BCB4-8156D1E0CD44.jpeg
E8CE10BC-D2B8-4041-BFD4-A9BD27CFB617.jpeg
F17440D0-CE10-4DF6-9203-7007DF58E68F.jpeg

Pay no mind to my messy fish room. ;Dead

I beefed up the general size of everything by adding some smaller pieces of rock that I thought flowed similarly as my original scape. I thought it looked a little too small before. It is currently one solid piece of rock. I decided to toss the idea of being able to disassemble it because this is my “do it right” tank so the plan is to not need to! Probably wishful thinking that nothing will go wrong but we will see. I am going to add some more mortar in between the cracks of some of the smaller pieces of rocks to make it look more like one rock rather than a pile of rocks. I also will add a sand layer after that to blend everything and get rid of the gray mortar look.

As you can see there are plenty of nooks, crannies, overhangs and caves. I did this by design. I do not plan on it but I would like to have the option to slightly over stock this tank. This was my best effort to make sure there were as many hiding spots as possible so everyone can have their own territory.

I also received my replacement light!

2313A298-93A0-4FE7-9D28-E1E0EF0801B2.jpeg
 

Erik the Red

Active Member
View Badges
Joined
Sep 15, 2020
Messages
159
Reaction score
65
Location
Denmark
Rating - 0%
0   0   0
It looks nice! The rock layout is cool, gives a lot of space for fishes to swim instead of creating a divide.
How much space is there from the front glass to the overflow area in the back?
 

Being sticky and staying connected: Have you used any reef-safe glue?

  • I have used reef safe glue.

    Votes: 66 85.7%
  • I haven’t used reef safe glue, but plan to in the future.

    Votes: 5 6.5%
  • I have no interest in using reef safe glue.

    Votes: 3 3.9%
  • Other.

    Votes: 3 3.9%
Back
Top