DIY Sump Thread

bendeng

Community Member
View Badges
Joined
Oct 12, 2013
Messages
45
Reaction score
21
Location
Gainesville, VA
Rating - 0%
0   0   0
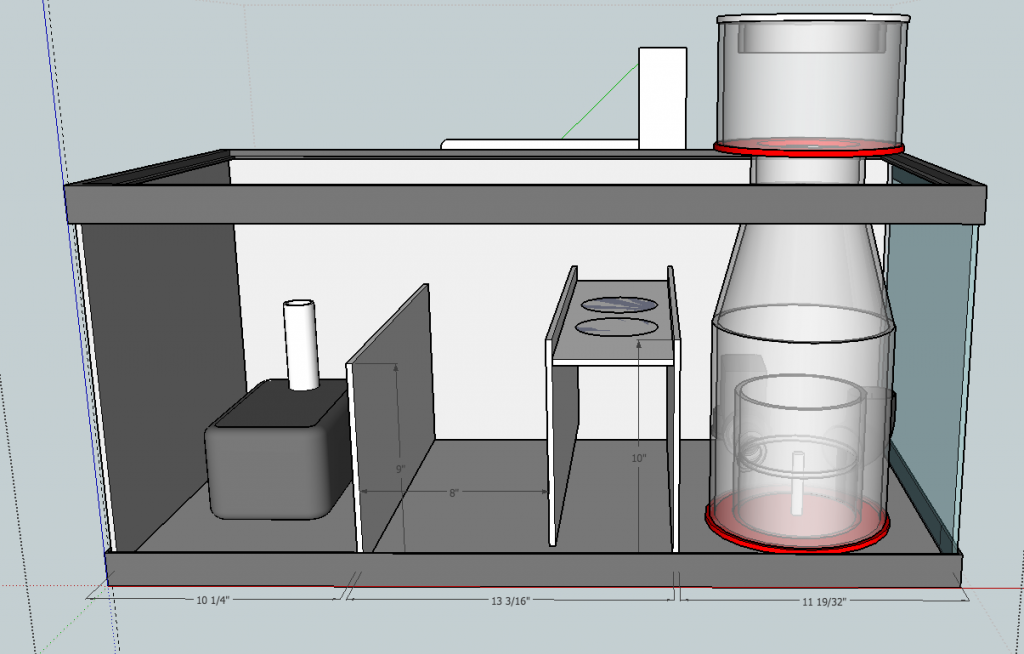
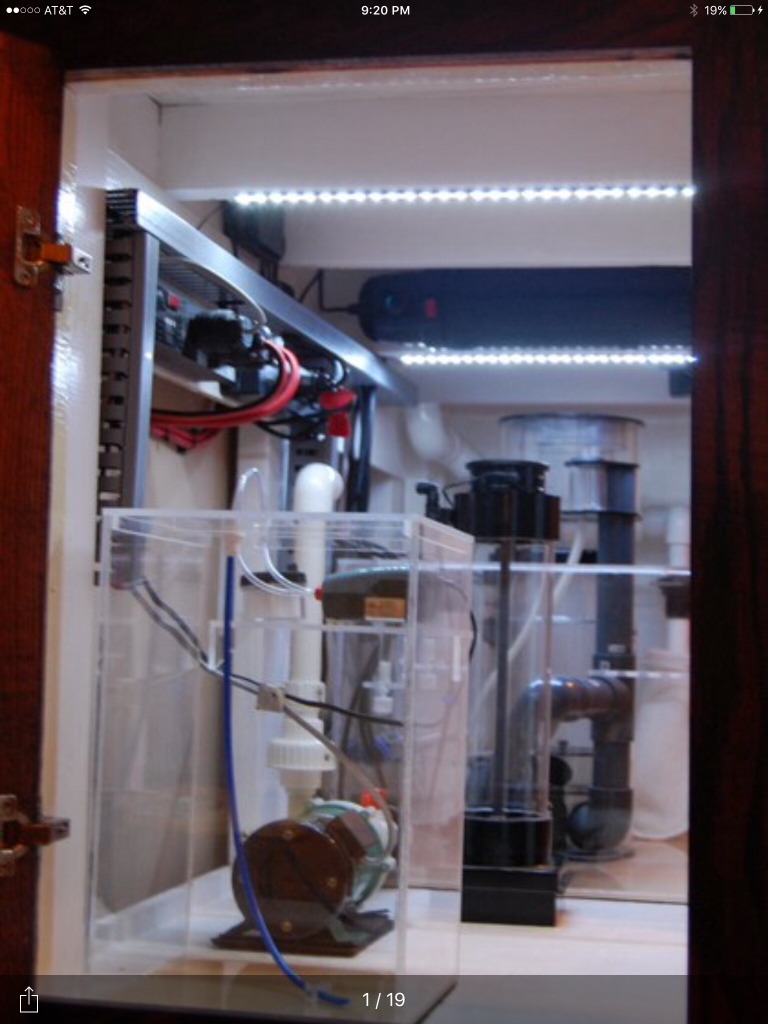
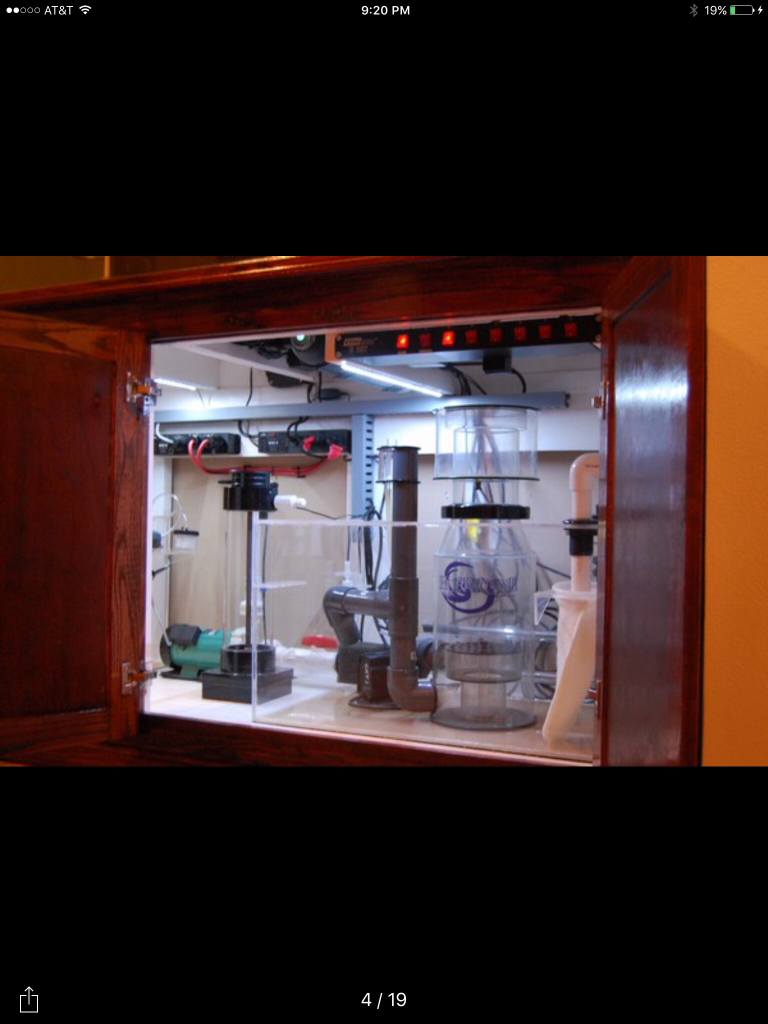
I didn't see any while browsing through so I figured why not start a collection of everyone's DIY home made sumps??

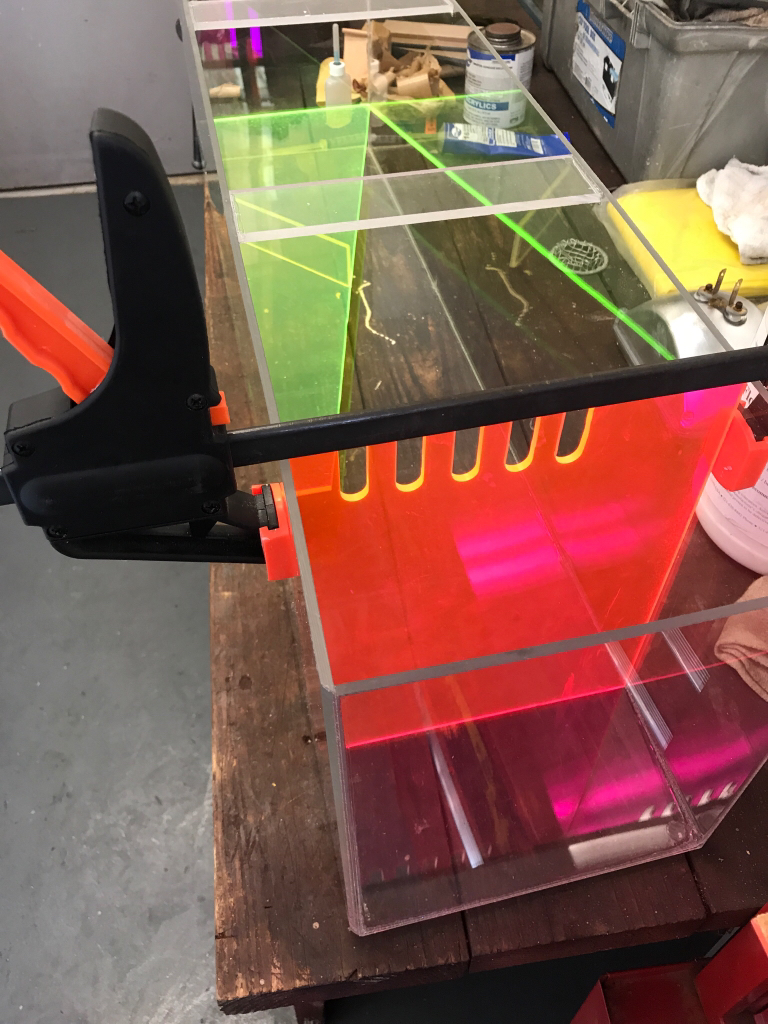
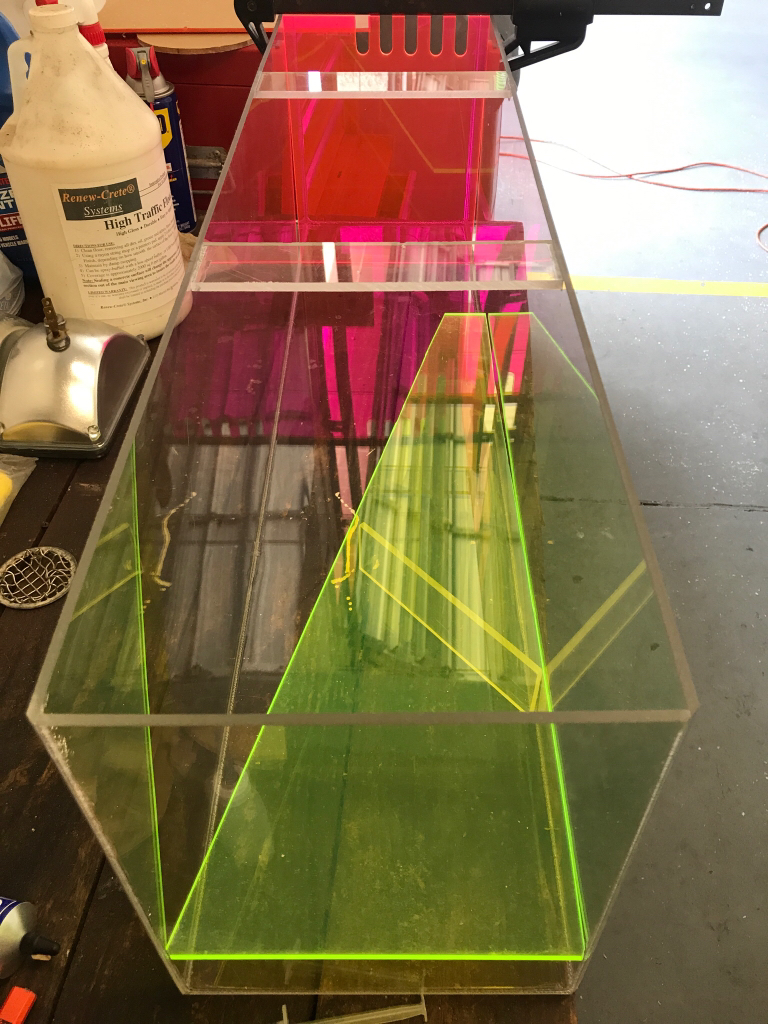
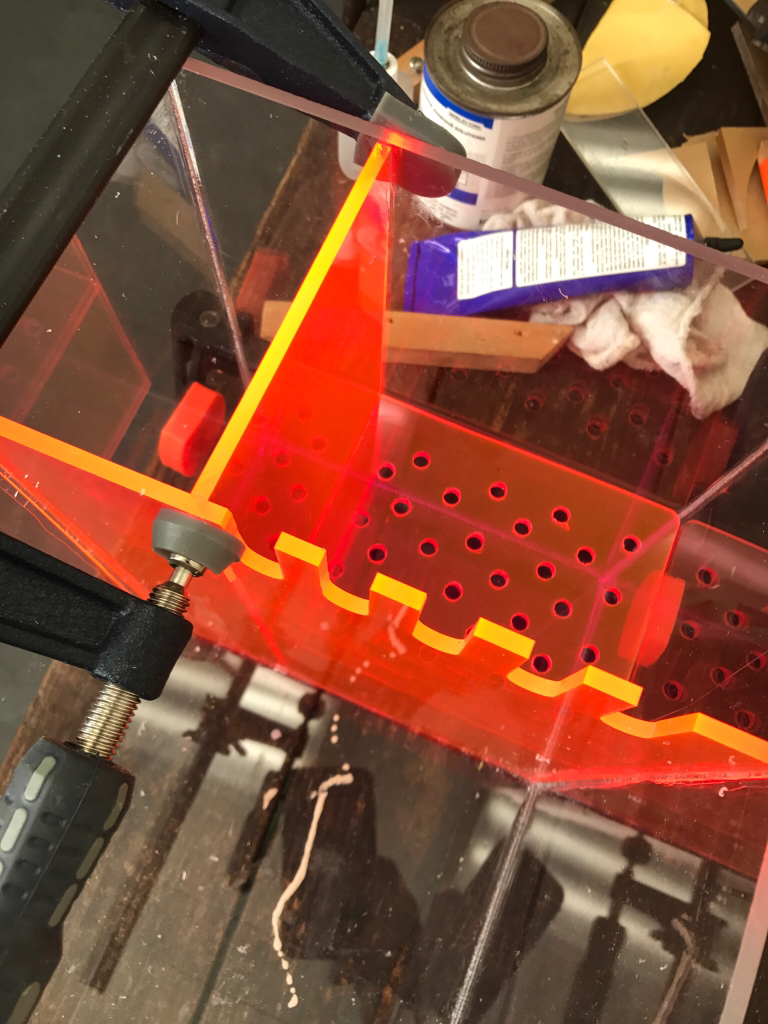
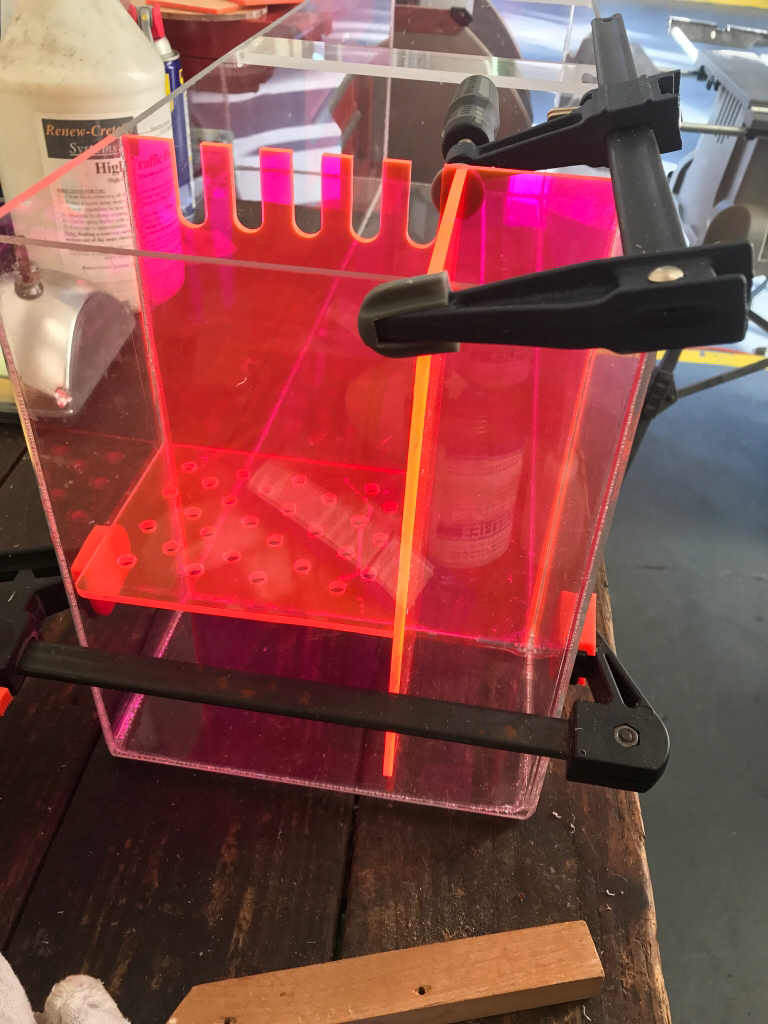
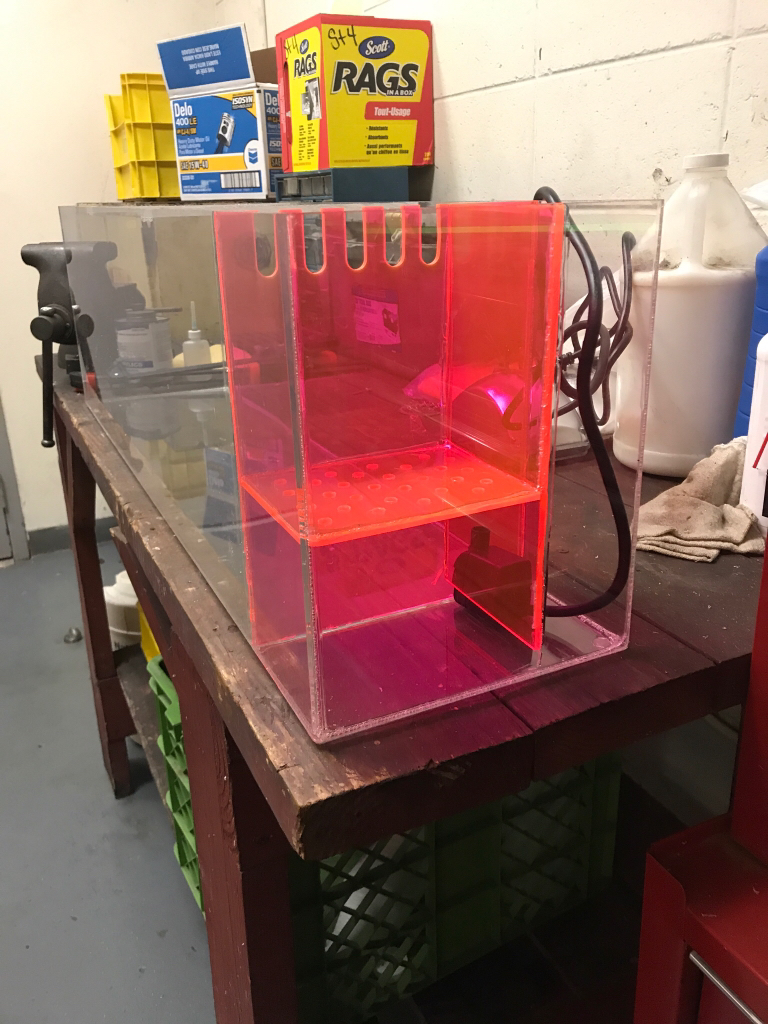
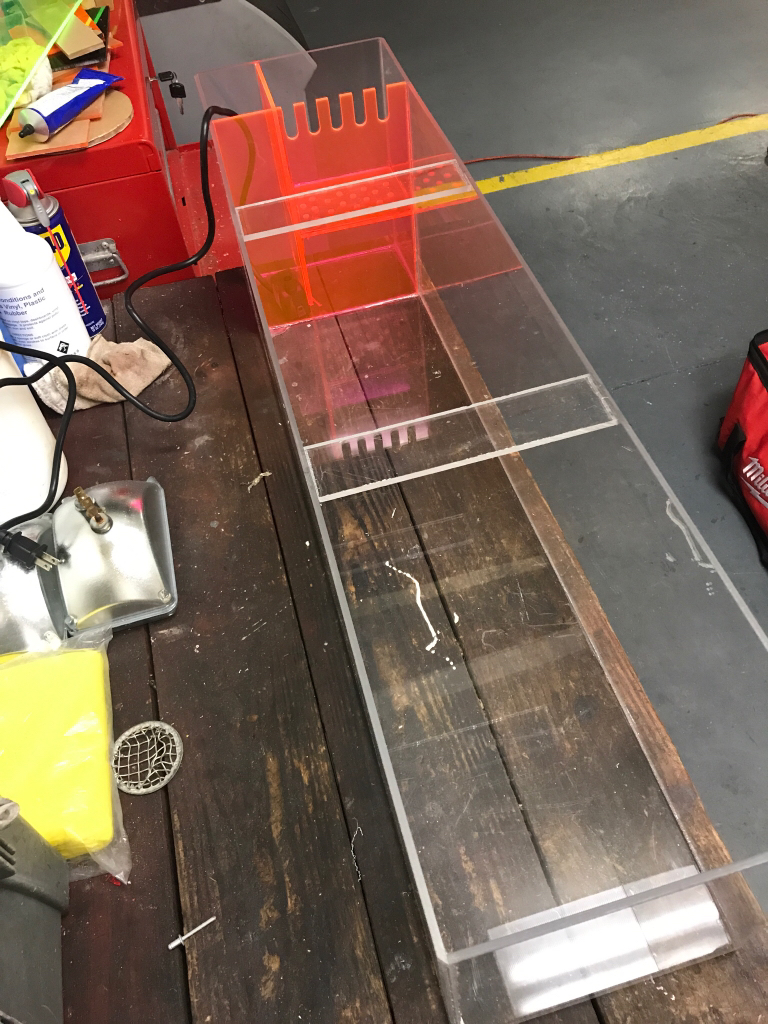
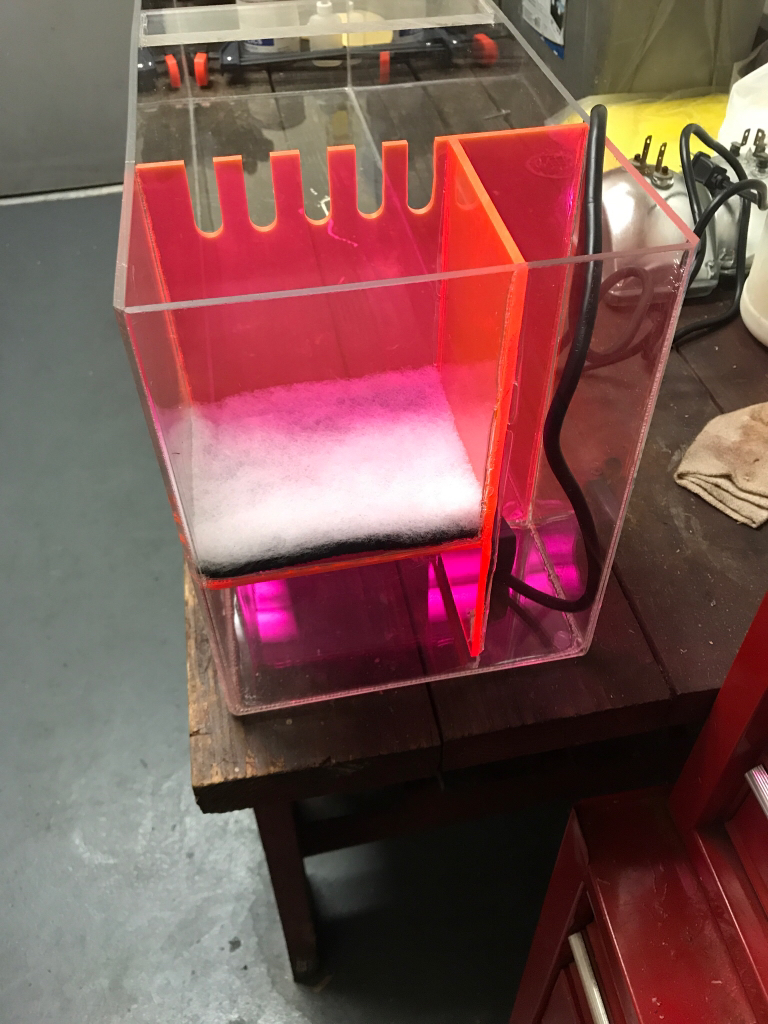
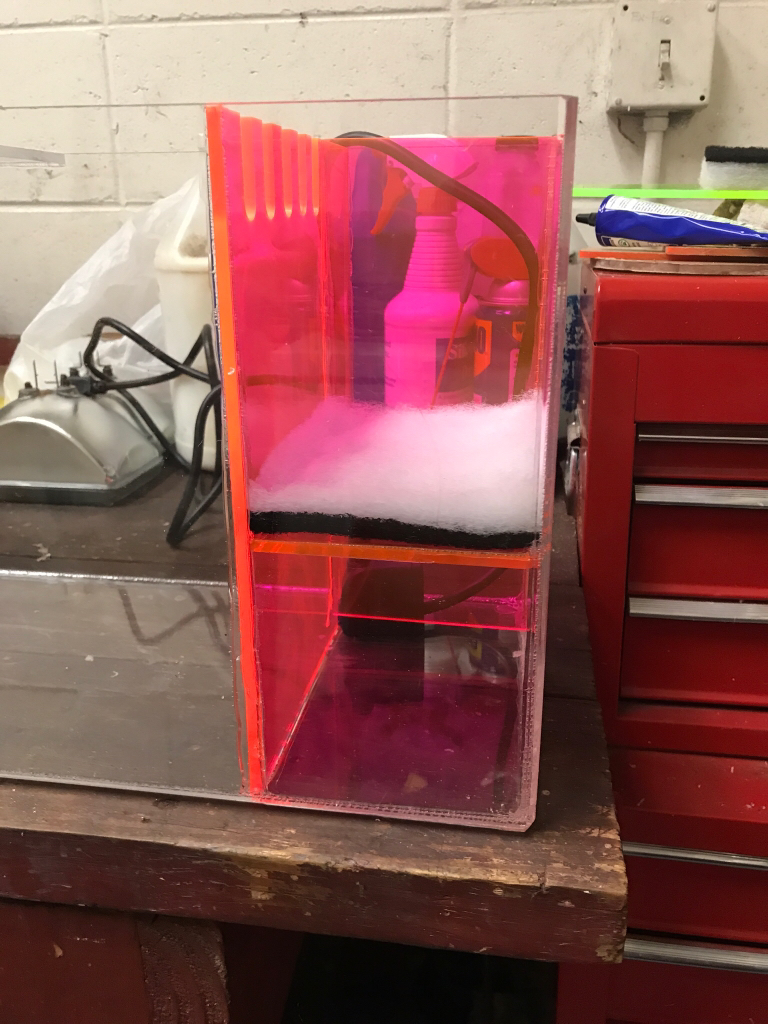
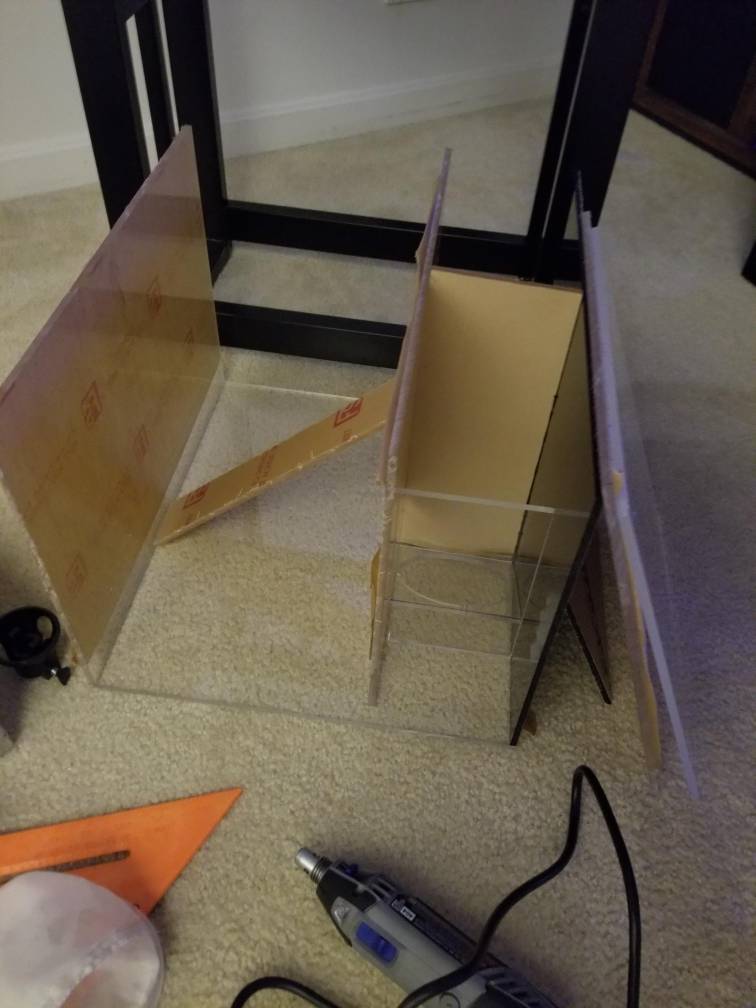
Mine is still in progress, I had originally made a sump out of a 10g glass tank with acrylic baffles silconed in, however, I started a new sump completely made from acrylic using 1/4" acrylic sheets. Mostly clear, used a black sheet for the back panel (it was all I had that fit) and we messed up the cuts on the sides so I ordered more (coming soon in turquoise!) Will use it for the sides and baffles. Hoping to be finished by this next weekend.

06d43927f2676b089e5128859e90e448.jpg


Share your pics of your custom made sumps!!
 

Sleepydoc

Valuable Member
View Badges
Joined
Apr 10, 2017
Messages
1,423
Reaction score
1,265
Location
Minneapolis, MN
Rating - 0%
0   0   0
Well, this is the Sketchup drawing of my 40b sump, but the actual sump looks the same, just real. ;)

A couple notes about acrylic baffles-
In general, I wouldn't advise using acrylic for baffles. Acrylic expands in water and I've seen several reports of sumps breaking when acrylic baffle have put too much pressure on the outer walls. If you do use acrylic, be sure to cut them about ⅛" narrower than you need so they have room to expand.

Another general issue with acrylic is that silicone won't bond to it long term. If you secure acrylic baffles with silicone fillets on each side, the baffle will remain wedged in place but will allow water to seep past. This generally isn't an issue for sumps, but I've seen people try to silicone an acrylic overflow box to the side of their tank with disastrous results.

If you go with glass, go to a glass shop and get 6mm/¼" glass. The thin plate glass they sell at Home Depot and hardware stores is too thin and breaks too easily.

Sumpoption2_zps9d55d561.png
 
OP
OP
bendeng

bendeng

Community Member
View Badges
Joined
Oct 12, 2013
Messages
45
Reaction score
21
Location
Gainesville, VA
Rating - 0%
0   0   0
Well, this is the Sketchup drawing of my 40b sump, but the actual sump looks the same, just real. ;)

A couple notes about acrylic baffles-
In general, I wouldn't advise using acrylic for baffles. Acrylic expands in water and I've seen several reports of sumps breaking when acrylic baffle have put too much pressure on the outer walls. If you do use acrylic, be sure to cut them about ⅛" narrower than you need so they have room to expand.

Another general issue with acrylic is that silicone won't bond to it long term. If you secure acrylic baffles with silicone fillets on each side, the baffle will remain wedged in place but will allow water to seep past. This generally isn't an issue for sumps, but I've seen people try to silicone an acrylic overflow box to the side of their tank with disastrous results.

If you go with glass, go to a glass shop and get 6mm/¼" glass. The thin plate glass they sell at Home Depot and hardware stores is too thin and breaks too easily.

Sumpoption2_zps9d55d561.png
Love the design! I ended up making a sump completely out of acrylic. It is less than 10g and my boyfriend used to assist with a LFS that specialized in acrylic builds so with his experience we decided to try and build the little sump. So far so good [emoji5]. We've built sumps our of glass tanks before using glass baffles and acrylic baffles up to 55g. No issues so far but I definitely will take note of your advice, TY!
 

litenyaup

2500 Club Member
View Badges
Joined
Sep 30, 2009
Messages
3,420
Reaction score
3,286
Location
Florida
Rating - 0%
0   0   0
This was the setup I build about 5 years ago for my custom 189 gallon build. Local acrylic shop is going out of business so I picked up some stuff for a great price!! Can't wait to get started.

035667764fe8bd9c3108dc6a696478fd.jpg


1eb0a5496e9224aab9f9d5e883c38c9c.jpg


1e45d2d4b8742563baf34f1bdeff5174.jpg
 
OP
OP
bendeng

bendeng

Community Member
View Badges
Joined
Oct 12, 2013
Messages
45
Reaction score
21
Location
Gainesville, VA
Rating - 0%
0   0   0
This was the setup I build about 5 years ago for my custom 189 gallon build. Local acrylic shop is going out of business so I picked up some stuff for a great price!! Can't wait to get started.

035667764fe8bd9c3108dc6a696478fd.jpg


1eb0a5496e9224aab9f9d5e883c38c9c.jpg


1e45d2d4b8742563baf34f1bdeff5174.jpg
Oh wow great cache of acrylic! I just got my sheet of turquoise 1/4" in the mail.
 

sebastiaan1985

Active Member
View Badges
Joined
Nov 15, 2015
Messages
242
Reaction score
139
Location
Enschede, The Netherlands
Rating - 0%
0   0   0
I am also planning to build my own custom sump using acrylic, anyone some advise on how to determine required thickness?
Sump will be 80cm long, 35cm width and 50cm high.

Am planning to use a full cover with cut-outs for equipment and easy access of the compartments. So guess this (along with separation between the compartments) will add in the strength.
 
OP
OP
bendeng

bendeng

Community Member
View Badges
Joined
Oct 12, 2013
Messages
45
Reaction score
21
Location
Gainesville, VA
Rating - 0%
0   0   0
I am also planning to build my own custom sump using acrylic, anyone some advise on how to determine required thickness?
Sump will be 80cm long, 35cm width and 50cm high.

Am planning to use a full cover with cut-outs for equipment and easy access of the compartments. So guess this (along with separation between the compartments) will add in the strength.
I used 1/4" all around. Standard thickness for tank builds for structure and stability [emoji5]
 

sebastiaan1985

Active Member
View Badges
Joined
Nov 15, 2015
Messages
242
Reaction score
139
Location
Enschede, The Netherlands
Rating - 0%
0   0   0
Here we have 4 mm and 5mm available or 8 mm.
This translates (roughly) to 1/6", 1/5" and 1/3".

With 1/6" being the most common. You reckon this could be sufficient? (Planning the baffles to be full height with cut-outs for required water level.
 
OP
OP
bendeng

bendeng

Community Member
View Badges
Joined
Oct 12, 2013
Messages
45
Reaction score
21
Location
Gainesville, VA
Rating - 0%
0   0   0
Here we have 4 mm and 5mm available or 8 mm.
This translates (roughly) to 1/6", 1/5" and 1/3".

With 1/6" being the most common. You reckon this could be sufficient? (Planning the baffles to be full height with cut-outs for required water level.
It's better than 1/8", I wouldn't recommend any thinner than that for sure. How big is the sump? Just want to be sure to avoid bowing from the weight of the water, although, sumps are usually only half filled. I would recommend 1/5" if it's feasible. Thicker is better. I've had baffled crack at 1/8" which is a step down from 1/4" for US sizing. How are you piecing it all together? I would recommend fusing the acrylic vs silicone (I forget what it's called but it's a liquid you line against the seams and it fuses the acrylic together).
 

sebastiaan1985

Active Member
View Badges
Joined
Nov 15, 2015
Messages
242
Reaction score
139
Location
Enschede, The Netherlands
Rating - 0%
0   0   0
Yes, am planning on fusing the acrylic. Sump would be roughly 32" x 14" x 16 or 18" (length x width x height) (guess height will be the biggest contributing factor)
Divided in 4 chambers (filter bags, fuge, skimmer, return)

1/6" is our 'standard', but 1/5" is also relatively easy to buy.
 
OP
OP
bendeng

bendeng

Community Member
View Badges
Joined
Oct 12, 2013
Messages
45
Reaction score
21
Location
Gainesville, VA
Rating - 0%
0   0   0
Yes, am planning on fusing the acrylic. Sump would be roughly 32" x 14" x 16 or 18" (length x width x height) (guess height will be the biggest contributing factor)
Divided in 4 chambers (filter bags, fuge, skimmer, return)

1/6" is our 'standard', but 1/5" is also relatively easy to buy.
Yea the 1/5" would be better in the long run, I always over prepare especially when it comes to tank haha. Better safe than sorry. Mine is much smaller (20l x 14d x 16h) but we've done bigger ones before. I'm only doing 3 chambers for this one, skimmer/sock, refugium, and return.
 

sebastiaan1985

Active Member
View Badges
Joined
Nov 15, 2015
Messages
242
Reaction score
139
Location
Enschede, The Netherlands
Rating - 0%
0   0   0
My plan is to redo the whole tank, (go a bit bigger ;)) and than change to my custom sump.

Will start some drawings and share them. Especially for the sump, because that will be a DIY.

Tank will be build be experienced builder along with the stand.
 

litenyaup

2500 Club Member
View Badges
Joined
Sep 30, 2009
Messages
3,420
Reaction score
3,286
Location
Florida
Rating - 0%
0   0   0
Kind of a Sump but I did an all in one qt tank/ frag tank. Messing with the orange and yellow acrylic. Had some free time at the fire station today so I had at it lol.

The yellow I have to drill holes for the frag plugs.

08d575f020ebe7b76d65b839e8b0e77a.jpg


dfada8b252ad3be3e9fa434d16b8236b.jpg


3bd76979f9677c8608753f52464b9040.jpg


8d089a2a9f8bd432b752d71c64b80cac.jpg


c09faa02a7230169a5729e663785a293.jpg


17399264408f7f2cfcdc2ab83589a53f.jpg


8ba98851f47d9c1aba68de164e4110fa.jpg


50e6bdcf699eca727c716205634291e9.jpg
 
Last edited:
OP
OP
bendeng

bendeng

Community Member
View Badges
Joined
Oct 12, 2013
Messages
45
Reaction score
21
Location
Gainesville, VA
Rating - 0%
0   0   0
Kind of a Sump but I did an all in one at tank/ drag tank. Messing with the orange and yellow acrylic. Had some free time at the fire station today so I had at it lol.

The yellow I have to drill holes for the drag plugs.

08d575f020ebe7b76d65b839e8b0e77a.jpg


dfada8b252ad3be3e9fa434d16b8236b.jpg


3bd76979f9677c8608753f52464b9040.jpg


8d089a2a9f8bd432b752d71c64b80cac.jpg


c09faa02a7230169a5729e663785a293.jpg


17399264408f7f2cfcdc2ab83589a53f.jpg


8ba98851f47d9c1aba68de164e4110fa.jpg


50e6bdcf699eca727c716205634291e9.jpg
I love it!!
 

TherealplexiG

Well-Known Member
View Badges
Joined
Jun 18, 2016
Messages
606
Reaction score
257
Location
Mars
Rating - 0%
0   0   0
@bendeng
It's really difficult to attain finish like that.. Working with acrylics is easy... Caulking this type of sump is another ball game..
 

Being sticky and staying connected: Have you used any reef-safe glue?

  • I have used reef safe glue.

    Votes: 127 88.2%
  • I haven’t used reef safe glue, but plan to in the future.

    Votes: 8 5.6%
  • I have no interest in using reef safe glue.

    Votes: 6 4.2%
  • Other.

    Votes: 3 2.1%
Back
Top